


It’s been one heck of a summer, and you’ve enjoyed many days of splashing around in your pool. But the days are growing shorter, and the weather is turning cooler. That means if you don’t live in a climate that lets you keep your pool open year-round, it’s time to get ready to winterize your pool. Winterizing your pool is essential in making sure that your pool doesn’t get damaged from freezing water. A generous side effect is keeping your pool as clean as possible to make your opening next spring as easy as possible.
Step One: Chemistry
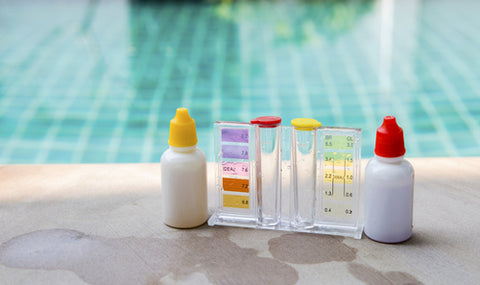
The first step in getting your pool ready for closing for the winter is to get your water’s chemistry under control. That means setting the pH, alkalinity, and hardness. The range that you want your water to be at is the following:
- pH: 7.2 to 7.4
- Alkalinity: 80 to 120 ppm
- Hardness: 180 to 220 ppm
This balancing of your pool’s water will make sure that the walls and floor are protected from staining. Shock the water with chlorine a few days before you’re ready to close your pool. You want the time so that your pool’s chlorine settles down to 1 to 3 ppm. You want the chlorine levels to drop to that point because high chlorine levels break down the algaecide that you’ll add later and can damage your pool cover.
Step Two: Water, Water, Everywhere
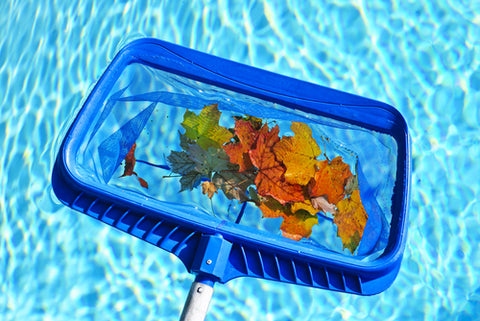
The next step in winterizing your pool is dealing with the physical parts of the water. First, you need to clean your pool. Use deep skimmers and nets to clean up the debris. If you have a pool crawler, let it get to work before you go any further.
While the pool-bot is cleaning or after you’ve skimmed all the debris out, drain enough water so that the level is below that of the skimmers. If you’re using a mesh cover, you want the water level anywhere from one-foot to a foot-and-a-half below the skimmer. For a solid pool cover, three to six inches below the skimmer is sufficient. Alternately, there are skimmer covers that fit over the mouth of the skimmers and prevent water from going in. If you use one of these Aquador dams, you don’t need to drain your pool at all.
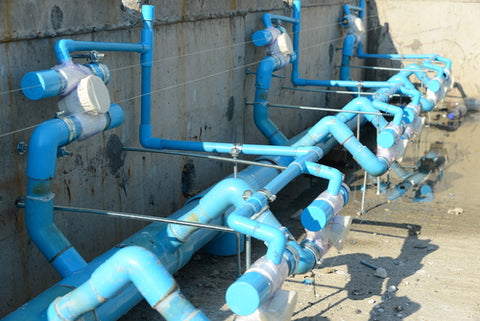
Step Three: Plumbing Factors
After you’ve cleaned the pool and dealt with the skimmers, you need to turn your attention to the plumbing lines. Use all of the drain plugs and an air-blower to blow the water out of each plumbing line in your filtration system. As you go along, make sure to put plugs in the lines on the poolside. Lubricate the gaskets to ensure a tight seal. This will help make sure that water doesn’t leak back into the lines. When you blow out the skimmer lines, use a Gizzmo to seal them. This will protect those lines should any water get into the skimmer.
While you’re cleaning out the plumbing lines, take the time to lubricate the rest of the o-rings and gaskets on the pump.
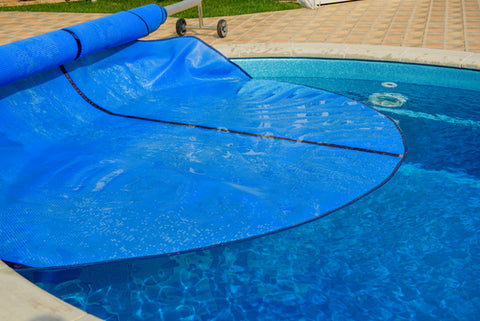
Step Four: Algaecide and Cover
Before you cover your pool and close it for good, make sure to add the algaecide. It’s essential that you not add the algaecide at the same time as the chlorine from step one. Again, the chlorine will stop the algaecide from functioning properly. Secure your winter floaters with string on all four sides to ensure that the floaters don’t come to rest against the wall.
Once your floaters are in place, it’s time to cover your pool. Do a brief walk along the cover to ensure there are no holes or tears where dirt and debris can get in. You should invest in a safety cover for maximum security. A safety cover is stronger than an ordinary pool cover; they can support the weight of a child or pet that falls onto them, ensuring they don’t get tangled in a collapsing cover.
Whatever type of cover you use, make sure that it’s secured properly with water bags or the appropriate cables. Invest in a cover pump and siphon as well to make sure that rainwater or melted snow does not damage your pool cover.

Sunbelt Residents
In some cases, you may not need to do a complete closing of your pool, especially if you live where temperatures rarely dip below freezing. In that case, winterizing your pool can be as simple as lowering the filtration and placing a cover on it. Partial winterization in the Sunbelt takes all of the above steps with the exception of blowing out the plumbing lines. Just remember that if you don’t cover the pool, there’s no sense in doing any sort of winterization. Without a pool cover, your pool will develop algae blooms and the pool will end up stained and require extensive cleaning.
Getting your pool properly winterized is essential to avoid costly damage to your pool, filtration system, and pump lines. Not only will this closing help your pool survive the winter, it will make the opening of your pool go more smoothly in the spring. With a little work and some proper planning, you won’t have to worry about the condition of your pool over the winter.